Use SIBS Backoffice to establish webhooks and stay updated regarding your payments. Follow the subsequent steps and choose the appropriate options that correspond to your desired updates.
To take advantage of this feature, you can easily set up webhooks to receive notifications for events within your account. This will enable you to stay informed and take appropriate actions when necessary.
In the “Webhooks” menu, you can view a list of all your webhooks. You can quickly apply filters by credential, notifications, type, and webhook (email or URL).
When you click on the Webhook icon, two options may be presented depending on the type of webhook. If the webhook is a URL type, you can access its details and test it. If the webhook is an email type, you can only view its details in more depth.


Add a new Webhook
Step 1: Choose Webhook type (Mandatory)
Step 2: Add an URL (Mandatory)
Step 3: Webhook application choice (Mandatory)
Step 4: Choose notification types (Mandatory)
Step 5: Webhook secret (Mandatory)
Step 6: Webhook email for support
To create a new webhook, you need to click on the “Add new webhook” button. Then, a set of steps will be presented to guide you in filling in the necessary data to create a webhook. The following images show an example of creating a URL-type webhook.
Step 1: Choose Webhook type (Mandatory)
When it comes to delivering notifications, a webhook for URL sends real-time data by making an HTTP request to a specified endpoint, whereas a webhook for email delivers the notifications by sending them as email messages to a designated email address.

Step 2: Add an URL (Mandatory)

Step 3: Webhook application choice (Mandatory)
Webhooks can be defined for the merchant, store, or terminal. If they are defined for the merchant, they will apply to all stores and terminals contained within it.
Defining webhooks for a store only applies to the terminals within that store.
If you want to define a webhook for a specific terminal, you should choose that option.

Step 4: Choose notification types (Mandatory)

Step 5: Webhook secret (Mandatory)

Step 6: Webhook email for support

Once all the required data has been filled in, you can click on the “Create webhook” button to create the webhook.
Webhook delete
If you have the permission to manage webhooks, you can delete notifications that are no longer needed. To do this, you must click on the “Delete” option located in the top right corner of the Webhook details page. Once you click on it, an operation confirmation popup will be displayed, and you can delete the Webhook.
Webhook test
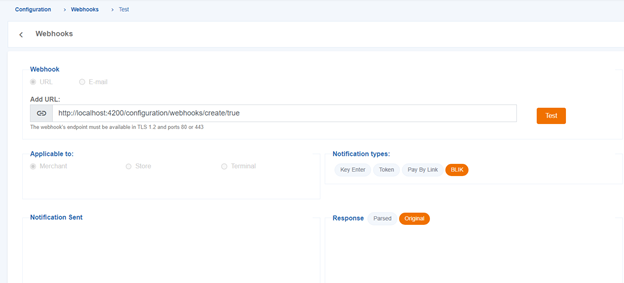
You can easily test a webhook as long as it is of type URL. To do this, simply click on the “Test” button and you will be directed to the webhook testing page. Once there, click the test button and wait for the request to complete successfully. The notification sent will then be displayed, confirming that the webhook is working correctly.

Webhook details
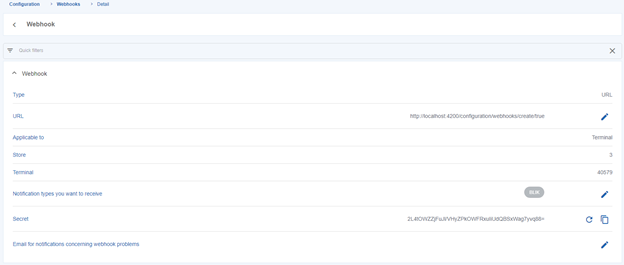
To view all the details of a webhook, you need to click on the “Details” option. This will provide you with a more detailed view of the webhook data. If you need to make any changes, simply click on the pencil icon to edit the information. Once you have updated the data, click on the save icon to ensure that the new information is saved.
