The MULTIBANCOConnect is a type of integration that enables the connection of point-of-sale software with a serviced SmartPOS terminal through the MULTIBANCOConnect application and the SIBS protocol. Once the connection is established, the point-of-sale system sends requests to the MULTIBANCOConnect application. These requests can include purchase transactions, returns, closures, receipt information, among others.
In an integration with MULTIBANCOConnect, authentication is carried out using credentials, so there is no need for recurring login.
1. Rule out battery failure by checking the functioning of the display when the terminal is directly connected to the mains, without battery; 2. Restart (“forced”): press the power button for 10 seconds to restart.
Blank screen (with possible noise)
1. Rule out battery failure by checking the functioning of the display when the terminal is directly connected to the mains without battery.
Blank screen / touch screen does not work / system menus do not respond
1. Restart (“forced”): press the power button for 10 seconds to restart; 2. If the terminal recovers after restarting, check if there are pending updates (see “Application Download”). After updating pending applications, restart the terminal.
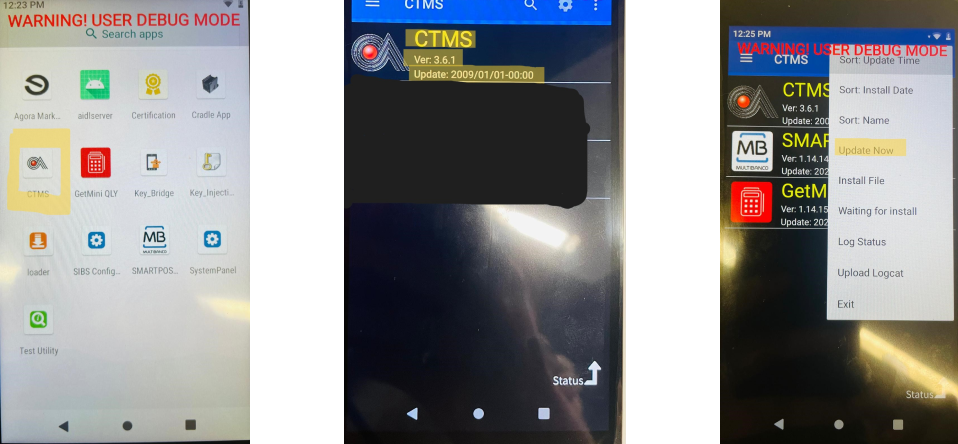
System panel menu
In the “Device” section, disable the “Status bar lock” option to allow access to the options at the top of the screen (for example, enabling the Merchant to choose Wi-Fi networks independently).
Connection
Wi-fi connection
1. From the “Settings” menu, choose “Wi-Fi” and log onto the network (wait about 15 seconds before trying to login or transaction again).
Problems with SIM card
1. Remove card and insert again; 2. Remove the battery, keeping the cable connected; 3. Wait about 15 seconds before trying to login or transaction again; 4. Validate that Wi-Fi is off before attempting to configure the access point (APN) (if not, try again after disconnecting Wi-Fi and restarting the terminal); 5. Wait about 15 seconds before trying to login or transaction again.
Battery/Charging
Permanent low battery / very fast consumption
1. Check for pending updates (see “Application Download”). After updating pending applications, restart the terminal.
Battery does not charge
1. Rule out battery failure by checking the functioning of the display when the terminal is directly connected to the mains without battery; 2. Try other power supply accessories (e.g. change cables).
Note: if possible, it is recommended to carry out a long charge with the terminal switched off.
Printer
Failed to read chip/magnetic stripe/NFC/contactless
1. Check if there are objects/debris blocking the card insertion or swipe (chip or stripe reading) and if they can be removed; 2. Check for pending updates (select the “Update” application on the main screen and choose the “Online Update” option). After updating pending applications, restart the terminal.
Note: if possible, it is recommended to test if the card works in another POS.
Printer does not print or paper is black
Check and change, if necessary, the orientation of the paper roll.
Paper does not come out of the printer or printing is unclear
Check if there are any paper objects/debris blocking the print head or the unrolling of the paper roll. If so, clean with a piece of cloth soaked in alcohol.
PIN PED
Failed to read chip/magnetic stripe/NFC/contactless
1. Check if there are objects/debris blocking the card insertion or swipe (chip or stripe reading) and if they can be removed; 2. Check for pending updates (select the “Update” application on the main screen and choose the “Online Update” option). After updating pending applications, restart the terminal. Note: if possible, it is recommended to test if the card works in another POS.
Printer does not print or paper is black
Check and change, if necessary, the orientation of the paper roll.
Paper does not come out of the printer or printing is unclear
Check if there are any paper objects/debris blocking the print head or the unrolling of the paper roll. If so, clean with a piece of cloth soaked in alcohol.
Updating apps
Updating the applications
In the applications menu, open the CTMS application and click on “Update now” to download any necessary updates.
Clear the application data
In the SystemPanel menu choose the “Settings” option. In this menu, under “Apps & notification,” you can find a list of all installed apps on the terminal. By selecting the desired app and clicking on the “Storage” option, you can choose between “Clear storage” and “Clear cache.” The “Clear storage” option will remove all payment application data. This option should be selected whenever uninstalling a physical device from a Merchant.
In both cases, the Merchant will need to log in again.
If the instructions above did not solve the issue, please contact us directly.
1. Rule out battery failure by checking the functioning of the display when the terminal is directly connected to the mains, without battery; 2. Restart (“forced”): press the power button for 10 seconds to restart.
Blank screen (with possible noise)
Rule out battery failure by checking the functioning of the display when the terminal is directly connected to the mains without battery.
Blank screen / touch screen does not work / system menus do not respond
1. Restart (“forced”): press the power button for 10 seconds to restart; 2. If the terminal recovers after restarting, check if there are pending updates (see “Application Download”). After updating pending applications, restart the terminal.
Connection
Wi-fi connection
From the “Settings” menu, choose “Wi-Fi” and log onto the network (wait about 15 seconds before trying to login or transaction again).
Problems with SIM card
1. Remove card and insert again; 2. Remove the battery, keeping the cable connected; 3. Wait about 15 seconds before trying to login or transaction again; 4. Validate that Wi-Fi is off before attempting to configure the access point (APN) (if not, try again after disconnecting Wi-Fi and restarting the terminal); 5. In the “Settings” menu, select “… More” and “Mobile Networks” to enter the APN “internetm2m”; 6. Wait about 15 seconds before trying to login or transaction again.
Battery
Permanent low battery / very fast consumption
Check for pending updates (see “Application Download”). After updating pending applications, restart the terminal.
Battery does not charge
1. Rule out battery failure by checking the functioning of the display when the terminal is directly connected to the mains without battery; 2. Try other power supply accessories (e.g. change cables).
Note: if possible, it is recommended to carry out a long charge with the terminal switched off.
Printer
Failed to read chip/magnetic stripe/NFC/contactless
1. Check if there are objects/debris blocking the card insertion or swipe (chip or stripe reading) and if they can be removed; 2. Check for pending updates (select the “Update” application on the main screen and choose the “Online Update” option). After updating pending applications, restart the terminal.
Note: if possible, it is recommended to test if the card works in another POS.
Printer does not print or paper is black
Check and change, if necessary, the orientation of the paper roll.
Paper does not come out of the printer or printing is unclear
Check if there are any paper objects/debris blocking the print head or the unrolling of the paper roll. If so, clean with a piece of cloth soaked in alcohol.
PIN PED
Not working
Check if:
The card reader has battery charge, or connect it to a PC, through a USB cable;
The card reader is powered on. Press the blue button on the upper part of the reader;
The card reader is well paired with the smartphone through the Bluetooth connection;
The purchase process is started in the smartphone’s APP that activates the card reader;
You have entered the correct amount in the smartphone’s APP and press “next”.
If you are still not able to use the card reader, please unpair and pair it again.
Doesn’t recognize the card
Please make sure that you have performed and checked all the steps described in the previous question. Also make sure that you insert the chip card in the reader’s card slot (on the lower part of the reader) or swipe the card’s magnetic stripe through the swipe slot (on the upper part of the reader).
Cards not accepted
Please make sure that you have an agreement with your Bank to accept the card’s payment scheme(s) (e.g.: MB, VISA, Mastercard).
System tampered
The reader has detected a security breach. It must be replaced.
Please contact the client support team (phone no.: +351 217 918 747).
Updating apps
Updating the applications
1. Select “Update” on the main screen of SmartPOS and choose “Online Update”;
2. Download the desired app;
3. Perform pending updates, if any;
4. After the process is completed, turn off and turn on the terminal again.
When attempting the “Update”, if the screen does not progress and an infinite loop occurs, clear the application data
Clear the local application data (restore the app):
On the main screen of SmartPOS, select “Settings” > “Storage” > “Applications”;
Find and select the app “xtms”;
Press the “Clear data” button.
If the instructions above did not solve the issue, please contact us directly.
Check out the latest updates for SIBS Smart Terminals, dating back to January 2025.
November 2025
SmartPOS
App v.1.24.1
NEW
Flexible authorization capture – Introduced flexible authorization operations, allowing the conversion of a pre-authorization into a purchase, or an increment, to be performed on a different TPA ID than the one used for the original authorization, as long as all terminals belong to the same Merchant. – Capture or increment operations can be executed by any user with appropriate permissions (Owner, Administrator, Manager). – Transaction details remain linked to the original authorization terminal (TPA ID), including the user who performed the operation. – To locate an authorization for capture or increment, users can access “Search Transaction”, select “Authorization”, and enter the Authorization Code, which is visible on both printed and digital receipts.
MB SPOT – Improved vavigation – MB SPOT transactions (when agreements are configured) are now reorganized and available directly from the left side menu in the payment application for faster access.
IMPROVED
Error message improvement – Enhanced the declined transaction message related to required accounting close. – New format: “Transaction declined. Please close the accounting period on terminal [TPA ID] before performing the next operation. [error code]”
Other operational and functional improvements to the payment application.
SoftPOS
App v.4.4.3
NEW
Two-step purchase (Pre-authorization flow) – Enabled two-step purchase flows to support use cases such as hospitality, accommodation, and car rental. – Cardholders can perform an initial authorization during reservation or service onboarding, with the final payment captured based on actual usage or consumption.
IMPROVED
Higher transaction limits – Maximum amount for purchase operations increased to €499,999.99, aligned with new SICOI limits for card-based transactions (Banco de Portugal Instruction No. 1/2024).
Call-in App integration improvements – Added support for two-step purchase acceptance via call-in app. – Introduced an optional flag to remove the card reader pairing button. – Phone-number-based payment is now disabled by default when using call-in app integrations. – Ensured consistent ‘Com. Error’ responses when call-in app requests are made while the device is offline.
Other operational and functional improvements to the payment application.
September 2025
SoftPOS
App v.2.7.0
NEW
Android 15 Compliance – The payment application has been updated to target Android 15 (API level 35) to ensure compliance with Google requirements. – This update guarantees compatibility with the latest security, performance, and functionality standards of the Android platform.
IMPROVED
Other operational and functional improvements to the payment application.
August 2025
SmartPOS
App v.1.23
NEW
Gasóleo Verde operations – Support for the “Gasóleo Colorido” (also known as Gasóleo Verde or Gasóleo Bonificado/com Benefício Fiscal) operation is now available. This operation is part of a public program that subsidizes fuel for agricultural use and government agencies. More information: https://www.dgadr.gov.pt/gasoleo – The “Gasóleo Agrícola” operation will be available when the agreement “390 – GASOLEO VERDE” is configured, and the Owner enables the service in the payment app settings or the xPOS Backoffice. – Associated services include: Diesel Refueling, Diesel Refueling with F.C. (Fiscal Card), and Card Inquiry. – Refund operations for Gasóleo Verde are available for both types of fueling (with and without the Fiscal Card) for Owner, Administrator, and Manager profiles. Performing a refund requires entering a password and using both the Beneficiary Card and the Fiscal Card (when applicable). – Transaction history in both the payment app and xPOS Backoffice will now display these transactions with the label “Gasóleo Verde”.
MB SPOT – Mobile and Internet Top-ups – Increased the “number” field from 9 to 12 digits to support a wider range of numbering formats.
IMPROVED
Error message improvement – Improved error messages to include the TPA ID when a financial close is required, e.g.: – “Please close the accounting period on terminal: 123456″.
Higher transaction limits – Maximum amount for purchase and authorization operations increased to €499,999.99, following the new SICOI subsystem limits for card-based operations (Banco de Portugal Instruction No. 1/2024).
Password policy for new users – Updated password requirements for new users, in line with enhanced security standards: – Minimum of 12 characters – Must include uppercase and lowercase letters, numbers (0-9), and special characters (!@#$%^&*)
Other operational and functional improvements to the payment application.
SoftPOS
App v.2.6.0
NEW
Flexible Refunds via Call-in App integration – Introduced the flexible refunds feature, allowing refunds to be processed on a different TPA ID than the one used for the original purchase, provided both belong to the same Merchant. – Refunds are always linked to the original transaction, and the Integrator’s application is responsible for storing the original transaction details.
IMPROVED
Error message improvement – Improved error messages to include the TPA ID when a financial close is required, e.g.: – “Please close the accounting period on terminal: 123456″.
Higher transaction limits – Maximum amount for purchase and authorization operations increased to €499,999.99, following the new SICOI subsystem limits for card-based operations (Banco de Portugal Instruction No. 1/2024).
Payment confirmation screen update – Removed the link button “If you want to send the transaction receipt, click here” from the payment confirmation screen.
Password policy for new users – Updated password requirements for new users, in line with enhanced security standards: – Minimum of 12 characters – Must include uppercase and lowercase letters, numbers (0-9), and special characters (!@#$%^&*)
Other operational and functional improvements to the payment application.
Backoffice
NEW
Gasóleo Verde operations for SmartPOS Terminals – Support for the “Gasóleo Colorido” (also known as Gasóleo Verde or Gasóleo Bonificado/with Tax Benefit) operation is now available for SmartPOS terminals. – The “Gasóleo Agrícola” operation will be available when the agreement “390 – GASOLEO VERDE” is configured, and the Owner enables the service in the payment app settings or the xPOS Backoffice. – Transaction history in both the payment app and xPOS Backoffice will now display these transactions with the label “Gasóleo Verde,” including: Diesel Refueling and Diesel Refueling with F.C. (Fiscal Card).
IMPROVED
Password policy for new users – Updated password requirements for new users, in line with enhanced security standards: – Minimum of 12 characters – Must include uppercase and lowercase letters, numbers (0-9), and special characters (!@#$%^&*)
MULTIBANCO Connect
App v1.00.21
NEW
Configuration file for Pairing Request – A new configuration file must be included in the Pairing Request by the integrator. This file defines the certified operations, enabling the ECR to perform any certified operation after pairing.
Automatic Reconnection mechanism – Introduced a mechanism that allows the ECR connection to be automatically re-established. This feature can be enabled or disabled as needed.
IMPROVED
Heartbeat notification enhancement – Heartbeat notifications now include the SmartPOS terminal serial number for better identification.
Other corrections and improvements.
July 2025
MULTIBANCO Connect
App v1.00.20
NEW
Single operation processing – Added a mechanism to ensure the app processes only one operation at a time. If a second operation is attempted, the ECR will receive a response notifying that the first operation is still in progress.
IMPROVED
Overview button lock – The Overview button on the SmartPOS terminal is now locked during payment operations for added security.
Other corrections and improvements.
FIXED
Loop issue correction – Fixed an infinite loop issue that occurred when the first operation of the day was initiated.
May 2025
SmartPOS
App v.1.20
NEW
New Login option – Users can now log in using the SmartPOS device serial number along with their email address: For active users: They can choose to log in either with their password or the device serial number. For new users:They can initially log in using the device serial number and email. Setting a password can be done later. Note: For performing refunds and other operations that require authentication, setting a password is always mandatory. – The sections “Request new card reader”, “Request new payment method”, and “Suggestions” have been removed
New types of Two-Step Purchase operation – The two-step purchase operation is now available in additional services such as vending machines, accommodation/hospitality management, rent-a-car, car wash, and self-service laundries. These use cases allow the Cardholder to perform an initial authorization at the time of booking or service access, with the final payment made based on the actual consumption or usage of the service.
Flexible Refunds – This feature allows refunds to be made on a different terminal ID than the one used for the original purchase, as long as they belong to the same Merchant. – Refunds can be performed by any user with the appropriate permissions (owner, administrator, and manager). The refund details will always be associated with the history and reconciliation of the terminal ID of the original purchase, including the information of the user who performed the refund. This functionality is enabled by default and can be accessed through the “Search Transactions” menu in the Payments app. Only the owner can disable this feature in the “Settings” menu. To find the transaction to be refunded, the user must search by purchase terminal ID, authorization ID, and the date and time of the transaction. These details can be found on the purchase receipt.
IMPROVED
Improvements to the maintenance menu intended for Technical Support Providers: ▪ Display of the HAL version; ▪ Availability of zero-amount payment to validate the correct operation of chip, contactless, and magnetic stripe readers;
Other operational and functional improvements to the payment application
FIXED
Correction in the purchase flow with DCC (Dynamic Currency Conversion) – adjustment in the markup display on the screen, according to the following rule: ▪ If the Issuing Country is in the EEA, the markup will always be displayed ▪ If the Issuing Country is outside the EEA: • Visa cards – display markup; • Mastercard cards – do not display markup. ▪ The United Kingdom is not considered part of the EEA and must follow the appropriate rule.
SoftPOS
App v.2.5.4
NEW
New Parameters added to the Call in App integration – Return of reconciliation data in the close call in app response – Single sign on
IMPROVED
Improvements to the maintenance menu intended for Technical Support Providers: ▪ Display of the HAL version; ▪ Availability of zero-amount payment to validate the correct operation of chip, contactless, and magnetic stripe readers;
Other operational and functional improvements to the payment application
FIXED
Correction in the purchase flow with DCC (Dynamic Currency Conversion) – adjustment in the markup display on the screen, according to the following rule: ▪ If the Issuing Country is in the EEA, the markup will always be displayed ▪ If the Issuing Country is outside the EEA: • Visa cards – display markup; • Mastercard cards – do not display markup. ▪ The United Kingdom is not considered part of the EEA and must follow the appropriate rule.
Backoffice
FIXED
Bug fix in user creation
MULTIBANCO Connect
App v1.00.19
FIXED
DCC Transaction Crash fix – Resolved an issue causing the app to crash during DCC transactions that required signature authentication.
March 2025
SmartPOS
App v.1.21
NEW
New feature added to MP SPOT – Transports
New parameters added to the Call in App Integration – Refund
IMPROVED
Automatic sending of the electronic close receipt to the email of the user who performed the reconciliation (applicable to Administrator, Manager and Operator profiles) and to the email of the TPA ID Owner, provided the “I want to receive an email with closure details” option is selected in the “Settings” menu of the Owner’s profile. All email dispatches of receipts will be reflected in the closure details.
Other operational and functional improvements to the payment application.
FIXED
Consistency between the accounting period number in Smart Terminals and that reflected in other SIBS channels (e.g., SIBS Backoffice).
DEPRECATED
Removal of the “Search Contacts” button on the receipt screen.
Backoffice
IMPROVED
Improvement in Transaction Search and Export – Removal of transactions limit
MULTIBANCO Connect
App v1.00.18
NEW
Foreground validation mechanism – Introduced a mechanism to validate whether the app is in the foreground before processing any command.
Exit to System option – Added a new “Sair para sistema” (Exit to System) option in the Maintenance Menu allowing merchants to close the app directly.
IMPROVED
Cancel Pairing notification – A notification is now sent when responding to the CancelPairing command.
TXRequest timeout removal – Removed timeout configuration from the TXRequest to streamline processing.
Other corrections and improvements.
February 25
MULTIBANCO Connect
App v1.00.17
NEW
Check Last Operation Command – Added a new ‘Check Last Operation’ command that allows merchants to view the last operation performed, including its status and receipts. Available via ECR request and the Maintenance Menu.
Pending Transactions Option – Introduced a new “Pending Transactions” option in the app, enabling merchants to check the status of any transaction interrupted during processing.
IMPROVED
Receipt notification improvement – Receipt notifications now include both merchant and customer receipts, each clearly labeled for easier identification.
Other corrections and improvements.
January 25
SmartPOS
App v.1.20
NEW
UX/UI Enhancements of the Payment Application – Menus have been reorganized, including changes to the layout of the application’s side menu. A new section has been created for the merchant profile, which now includes account management options such as “Manage TPA”, “Change Password”, and “Security” – The sections “Request new card reader”, “Request new payment method”, and “Suggestions” have been removed
New parameters added to the Call in App Integration – Return of additional data in the close call in app response – Automatic exit of the call in app with a timed configuration
New functionality in the maintenance menu – ‘Clear app storage data’ in the maintenance menu for Technical Assistance Providers
IMPROVED
Possibility to print a merchant receipt without the need to print the customer receipt
Introduction of the ability to reprint the reconciliation receipt in the Close menu under Transaction History
Automatic sending of the electronic close receipt to the email of the user who performed the reconcilliation (applicable to Administrator and Manager profiles) and to the email of the TPA ID Owner, provided the “I want to receive an email with closure details” option is selected in the “Settings” menu of the Owner’s profile. All email dispatches of receipts will be reflected in the closure details
On the tip amount entry screen, the phrase “Add a tip” has been added
Other operational and functional improvements to the payment application
FIXED
Consistency between the accounting period number in Smart Terminals and that reflected in other SIBS channels (e.g., SIBS Backoffice)
DEPRECATED
Removal of the “Keep session active” checkbox on the login screen, as sessions will remain active by default
SoftPOS
App v.2.3.2
FIXED
Consistency between the accounting period number in Smart Terminals and that reflected in other SIBS channels (e.g., SIBS Backoffice)
Backoffice
IMPROVED
Improvement in Transaction Search and Export – Ability to export multiple Terminal IDs simultaneously. This enhancement is subject to the export capability of the browser itself
FIXED
Consistency between the accounting period number in Smart Terminals and that reflected in other SIBS channels (e.g., SIBS Backoffice)
The process to certify your SmartPOS terminal at SIBS begins with its validation and applicability for SmartPOS. If business accreditation is successful, the manufacturer will initiate the process to certify its terminal to be accepted within SIBS managed networks.
The certification process itself consists of the following five (5) major stages . Each stage is composed of different activities. In the table belowe provide descriptions over them, outlining the correspondent responsibility.
Step
Description
Responsability
(1). Evaluation
Request for certification by the partner and opening of the process by SIBS.
SIBS / Partner
(2). Development
Development and testing of the solution by the partner.
Partner
(3). Certification
Delivery of the solution to SIBS to begin certification. Testing of the MULTIBANCO network and international brands.
SIBS / Partner
(4). Pilot
Installation of a limited number of terminals in PRD to evaluate the robustness of the solution.
SIBS / Partner
(5). Closure
Completion of the certification process and rollout of the PRD solution.
This is a dedicated section referring to the SmartPOS Terminal Certification process at SIBS. At SIBS we aim to ensure that our systems and Smart terminals execute transactions complaint with the latest protocol and brand specifications. We built this section to provide you visibility into the various stages of the certification process; outlining the specifications that suppliers must consider when bringing terminals to SIBS managed networks.
Let’s delve into some of the concepts and developments inherent to Terminal Certification at SIBS.
Hardware Abstraction Layer (HAL)
The SmartPOS HAL is a standard for the development of SmartPOSAPP* that operates independently to the Hardware. It utilizes an abstraction architecture based on the Android Interface Definition Language (AIDL). The AIDL enables the definition of the programming interface agreed upon by both the client (the high-level payment SMARTPOSAPP) and service (the low-level layer that takes care of the hardware) for communication through inter-process communication (IPC).
The HAL acts as an intermediary layer that facilitates the integration of multiple applications within the SmartPOS terminals (except Nexgo). Positioned between the SMARTPOSAPP and the vendor’s specific SDK, the HAL serves as a middleware. Its inclusion signifies that SmartPOS software interface is hardware-agnostic.
During payment operations the payment application resorts to the HAL to deal with card processing, PIN processing, security related processing, some level of user interface and printing.
*SmartPOSAPP: An Android application that runs on the SmartPOS hardware device that uses the HAL
Remote Key Loading (RKL)
RKL is the process of transmitting the DUKPT (Derived Unique Key per transaction) from our Key distribution Host (SIBS) to a terminal. This involves the use of asymmetric techniques for authentication and encryption on both ends, streamlining and securing the key-loading proccess. This not only improves operating efficiency but also enhances security, guarding terminals against tampering.
SIBS RKL protocol falls into certificate-based – we use certificates to transmit information rather than relying on keys.
Mobile Device Management (MDM)
The Mobile Device Management is used to remotely manage applications multiple SmartPOS terminals, including tasks such as installing and uninstalling applications on the terminals.
What type of payments can I accept in MULTIBANCO Service with mPOS and SmartPOS?
With this service, you can accept payments with domestic and international cards, wallets and MB WAY.
What type of Schemes are supported?
Devices
mPOS
SoftPOS
SmartPOS
Payment schemes
MB
VISA
Mastercard
AMEX
Only chip and magnetic stripe
UPI
Only chip and magnetic stripe
What if I am not being able to accept payments from a specific brand, although supported?
Please verify directly with your Acquirer if an agreement to accept cards from a specific brand has been registered.
What is the MB WAY solution?
MB WAY is the first interbank solution that allows to make purchases using a smartphone or a tablet, by associating a bank card to the phone number and setting a 6-digit PIN.
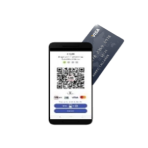
To accept a payment with MB WAY, you must enter the mobile phone number or e-mail address supplied by your Client in your MULTIBANCO APP, or read the client’s QR code directly
Afterwards, your client receives a notification in their MB WAY APP to accept the payment.
Can I accept payments with contactless cards?
Yes.
With the contactless option, the client can pay for low-value purchases, without any contact between the card and the POS terminal, simply by confirming the amount to be paid and tapping the card close to the card reader, without the need to introduce the personal code (PIN). Payment is completed in a few seconds.
Can I accept payments with tips included?
For SmartPOS and mPOS/ SoftPOS tips are supported.
To accept payments with tips the Merchant with an owner profile must activate the functionality in the SmartPOS payment application or in the associated backoffice. To do so, navigate to the “Settings” menu, select “Yes” in the “Receive Gratuity” field, and then click “Update”. If allowed by the Owner, users themselves can activate/deactive tips for their profile.
The activation of this feature is reflected across all Merchant’s POS ID. The owner can also determine whether each associated user can activate / deactivate this feature by selecting the option “Yes” in “Gratuities” per User field and then click on Update. This way, each user will be able to define whether they want to activate or deactivate Gratuities for their profile by selecting “Yes” or “No” in the “Gratuities for Current User” field, available in the “Settings” menu.
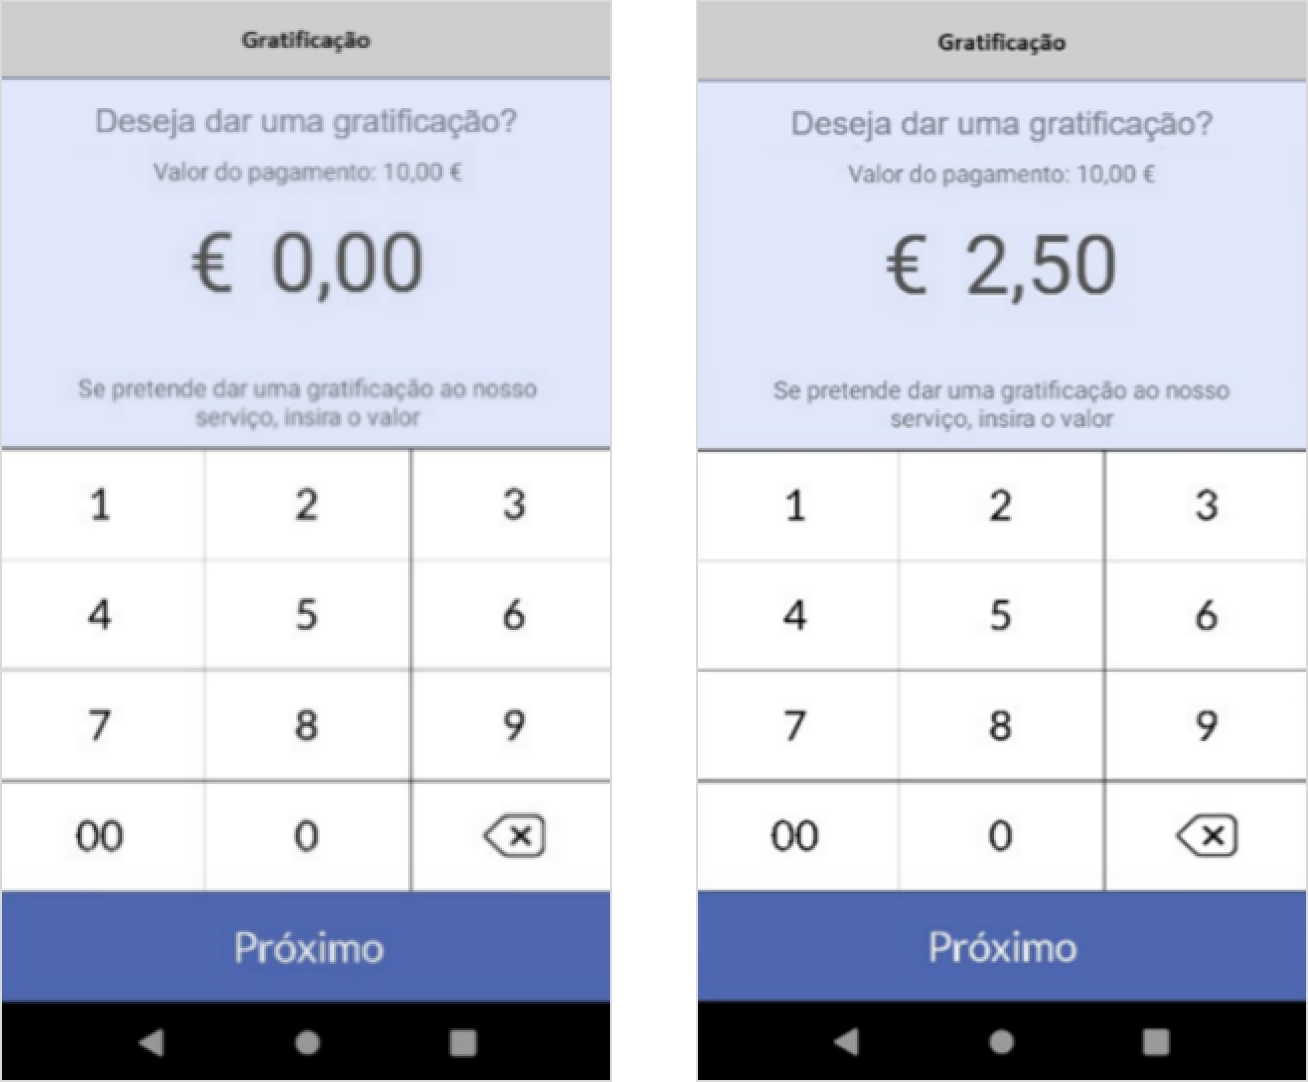
Once the purchase amount is entered, the Customer has the option to add a gratuity to the total amount to be paid. If the customer does not wish to add a gratuity, simply click the “Next” button without entering any additional amount.
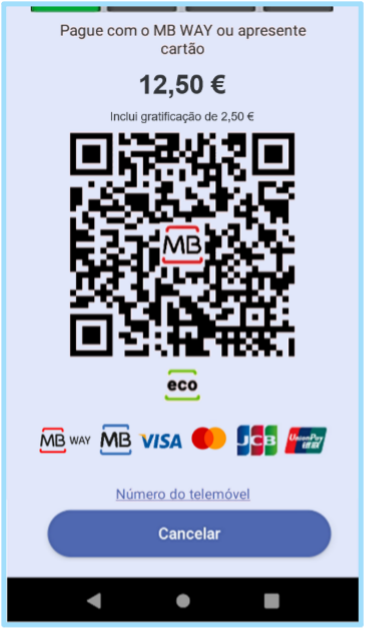
On the payment screen, the total amount that the Customer will pay is displayed, along with the details of the purchase amount and the gratuity amount.
Can I add a reference associated to a specific payment?
Yes.
When entering the purchase amount, a dedicated field “Referência”(reference) is displayed. You can fill it with letters or numbers, containing a maximum of 25 characters.
The reference will appear within the printed and digital receipts as well as on the transaction details.
Additionally, the reference will be displayed within the “Transactions Record” on your backoffice.
Service enrollment
How can I onboard in MULTIBANCO Service?
To enroll in the service, you must contact your Bank directly through the usual channels (bank branch, client support call centre, etc.). This contact can be eased by filling out the enrolment form available in the APP or in the Backoffice.
What is the service pricing?
Request a Business Proposal from your Bank, regarding the use of this service.
Backoffice browsers
What is the Backoffice?
Both solutions – mPOS/SoftPOS and SmartPOS – own a Backoffice. Through the Backoffice the merchant can manage remotely several features such as:
Account Activation
Real time access to transactions performed in the terminal o Execute Total and partial refunds
Payments with MB WAY
User Management
Account settings
Batch closure
Which operating systems are supported
Firefox v36 – or higher
Chrome v41.0 – or higher
Safari v8.0 – or higher
Internet Explorer v11 – or higher
How to access the Backoffice?
The Backoffice is available through a pre-set specific link for each TSE as proven below:
You should download the app to your mobile through Play Store or App Store.
The mPOS App is supported by the operating system iOS 8.0 (or higher) and Android 5 (or higher), on smartphone or tablet devices.
The SoftPOS feature of the SoftPOS only works on Android devices with NFC.
The apps are branded accordingly to your Bank, as defined below:
Caixa Pay
Moove
Touch 2 Pay
Reduniq
Pago (Get Mini)
BPI mobilePOS
SmartPOS
By the time you receive the terminal in your establishment, the app is already installed.
The SmartPOS App is supported by Android 5.
What should I do if I can not find the mPOS/SoftPOS app on the PlayStore / App Store?
There are few reasons why the mPOS/SoftPOS app might not be showing up on the Play Store / App Store. Here are a few things to check:
Check the countries where your app is available
Make sure that the app is compatible with the devices you are using
Where can I activate my account?
You can activate your account directly through the APP or Backoffice.
How can I activate my account on SIBS Payment App?
Before activating your account, please ensure you have:
Stable wi-fi connection
The email message that contains your onboarding code
Via Application
By the time your Terminal Support Entity (TSE) registers the terminal in SIBS system (Merchant’s email address should be provided), an onboarding code is sent to this this email address to activate SIBS Payment app.
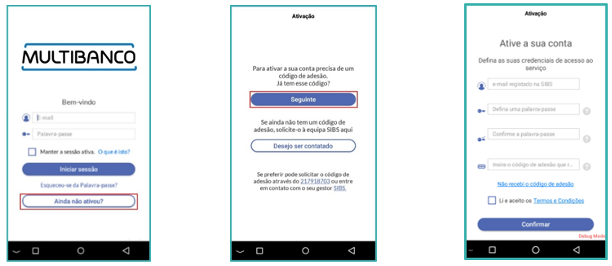
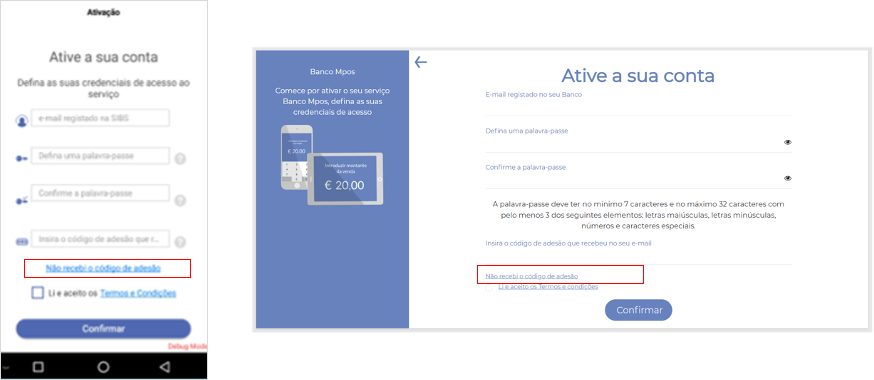
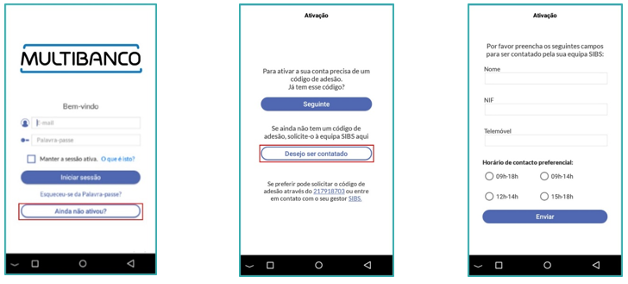
When opening the app, you should go to “Ainda não ativou?”.
Fill in the first field with the email you have provided for activation, define, and confirm new password and enter the code received on the email addresss.
Note: This code is valid for 8 days – if it’s not used throughout that period, you will have to request a new code directly to your TSE.
To finalize the activation process, it is necessary to enter the mobile number to which an activation code will be sent.
Via Backoffice
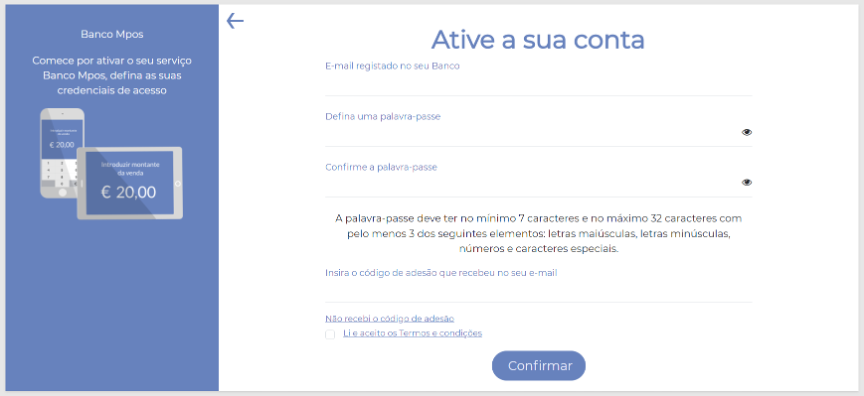
Similar to the activation process via the application, for the Merchant to activate their account, they simply need to access the Backoffice link provided by TSE and click on the “Como Ativar” menu, then “Activar”.
The Merchant will be redirected to the web page represented in the figure below, where they will need to enter the email previously provided to TSE as well as the onboarding code sent to it and set a password.
How can I request the resending of the onboarding code?
Through the App or the Backoffice, if the Merchant has not received the onboarding code at the email address previously provided to TSE, they should request its resend by selecting the “Não recebi o código de adesão” button and entering the email address registered at SIBS.
If, despite this, the Merchant has not received the onboarding code, they should provide their details to be contacted by their EAT later, as illustrated in the following screens:
What is the validity of the onboarding code?
The activation code is valid for 7 days from the moment when it is sent to the e-mail address.
Card Reader in the mPOS
Why do I need a card reader in the mPOS?
Couldn’t I do all the operations in the smartphone or tablet?
The card reader in the mPOS is used to accept payments via card, chip or stripe.
How is the authorisation of a cart payment processed in the mPOS?
To authorise the payment, the end client of the merchant must approach the card close to the device (smartphone or tablet).
How is the authorisation of a card payment processed in the mPOS?
To authorise the payment, the end client must insert the card in the card reader and follow the instructions. For some cards, the client’s signature might be required, instead of the PIN. In such cases, the client must write their signature on the screen of the smartphone or tablet and his signature must appear on the receipt (proof of payment) in digital format.
Using the App
What is the SIBS Payment application?
The SIBS Payment application belongs to the MULTIBANCO service and allows merchants to accept payments on a mobile device (mPOS & SoftPOS) or in a dedicated terminal (SmartPOS) in a seamless, quick, and easy way.
Runs on Android* and iOS** and accepts card payment and MB WAY.
* Applies to mPOS, SoftPOS and SmartPOS
** Only applies to mPOS
Do I need internet access on my POS/smartphone/tablet to use the service?
Yes.
The user must have an active data connection through a mobile network or Wi-Fi connection for the APP to communicate with SIBS’ central system and be able to receive the service messages.
Can I use the service in multiple POS/smartphones or tablets?
Yes.
You can activate the service in more than one device, if you enter the access credentials (e-mail and password) and the activation code that you received by SMS in the mobile device where you have activated the service for the first time. The devices activated with the same account share the same information.
When can I make the terminal Closure?
You can make the terminal Closure whenever you wish, either in the APP or in the Backoffice, by selecting the option “Closure” in the main menu.
The value calculated on that period will be credited according to the conditions agreed between the Merchant and the Bank. An automatic central closure will be executed on the days 7, 14, 21 and on the last day of the month for those terminals that have not performed the accounting closure for over 6 days.
After this central closure, the Merchant must make a closure in the APP or in the Backoffice, before new transactions can be started.
When do I receive the payments in my bank account?
That depends on the service level agreement settled between the Merchant and the Bank.
How can I consult Closure transaction records?
You can view that information in the APP or in the Backoffice through the “Closure” option in the History menu. Here, you can view all the detail regarding the terminal Closure, namely the operation date and the amount to be credited to the account, net of the Merchant Service Fees, per Financial Product (e.g.: MB).
Can I perform a purchase refund?
Yes.
It is possible to make a purchase refund in the APP or in the Backoffice. You have to select the original purchase operation, access to its detail and then select the option “Refund”. Only the Owner, Administrator or Manager profiles are able to make refund operations. Please note that the refund will only be effective if you have sufficient balance in that accounting period, i.e., if the total amount of purchases in the accounting period is higher than the refund amount, or if your Bank provides a previous authorisation on it.
Can I make a partial refund?
Yes. The Merchant can change the refund amount to a lower amount.
Account management
What is the password policy?
The user’s password to access a MULTIBANCO Service, either via APP or Backoffice, must comply with the following rule policy: 7- character minimum and 32-character maximum length; must be a compound of, at least, three of the following four groups of characters: uppercase, lowercase, digits and special characters.
How can I recover my password?
A user’s password can be recovered upon request of the Merchant in the APP or in the Backoffice, by clicking on the text “I forgot my password”, on the Login page. After requesting the password recovery, a Password Recovery Code will be sent to the user’s mobile phone. This code is valid for 30 minutes and must be entered in the APP or in the Backoffice. If the code expires, a new one must be requested. After entering the code, the user must redefine a new password. In no case will a new password be sent to the Merchant’s e- mail address or mobile phone.
How can I change the password?
The Merchant can change the password whenever he wishes, either in the APP or in the Backoffice, by accessing the Settings menu and selecting the option “Change password”.
How can I recover the e-mail of access to the service?
For security reasons, please contact your Bank for this purpose.
What type of profiles and users can I create?
The user who onboards and requests the service at the Bank will be assigned the Owner profile. This profile is able to create 3 types of users: Administrator, Manager and Operator.
How to create users?
This action is performed through the Backoffice, through the menu “Users Management”. To create a user you will need to provide information on:
A phone number
An email
Please note that it is not possible to create users with email that are already associated to a SmartPOS/ mPOS solution.
Assign a profile to the User
What are the permissions of each user profile?
Four (4) user profiles are available: Owner, Administrator, Manager and Operator. Each profile is able to perform the following activities:
Functionalities
Owner
Administrator
Manager
Operator
Create / Delete user with Admin profile
Create / Delete user with Manager profile
Create / Delete user with Operator profile
Make sales with card
Make sales with MB WAY
Send proof of payment
View history of own user
View history of all users
Manual closure
View information about manual closure
View settings
Change settings
Make refunds with card
Make refunds with MB WAY
Activate gratifications**
Make purchases with gratifications
**Only available, if enabled by the Owner profile
Proof of payment (receipt)
What is the proof of payment (receipt) for?
The proof of payment (receipt) is a document evidencing that the payment has been processed in SIBS network and it can be required for dispute purposes. Please note that this document is not an invoice/receipt and, therefore, it has no value for tax purposes. If your client requests an invoice/receipt, you must create it in an adequate system for that purpose.
How to print a proof of payment?
After completing an operation with success, the Merchant can print the proof of payment in SmartPOS by pressing on “Print Receipt”. If for any reason the receipt is not being printed please check with client if the MB WAY ECO feature has been previously enabled.
In need of resending an electronic proof of payment, visit the Transactions Record Section, enter the transaction details by pressing on it and click on “Comprovativo” following by “Print Receipt”.
How do I send the electronic proof of payment?
After completing an operation with success, the Merchant can send the proof of payment in electronic format to the client’s e-mail address.
In need of resending an electronic proof of payment, visit the Transactions Record Section, enter the transaction details by pressing on it and click on “Comprovativo” following by “Send Receipt”.
How can I resend the electronic proof of payment?
If, for some reason, the client asks the Merchant to resend the proof of payment, either to the same or to a different e-mail address, the Merchant must go to History → Operation Details → Resend Receipt.
Operation records
How can I view the operation Records?
All operations performed by the Merchant can be viewed in the APP’s or in the Backoffice’s History; the Merchant may filter those operations using search criteria. In the Backoffice, you can filter by Date, Interface, Payment Method, Operation Status, e-mail, Mobile Phone, Reference and Amount. In the APP, you can filter by Date, e-mail, Mobile Phone, Card No. and Amount.
What detail can I view in the History for each operation?
You can view the following detail per operation: amount; payment method, transaction type, interface used to perform the operation; the card number used for a payment with card, or the e-mail address or phone number, for a payment with MB WAY; the e-mail address where to the proof of payment was sent; the operation status.
Can I export the History information to a document?
If you access the information in the Backoffice, you can export the operation data in the History to a .csv file.
Security
Does MULTIBANCO service send any codes by e-mail?
Yes.
But only the activation code is sent to the e-mail address which has been registered at the Bank; all the remaining codes are sent by SMS. If you receive any contact with a link, or asking for you to supply any data regarding the MULTIBANCO service, please inform your Bank at once, or report the event to the client support team (+351 217 918 703).
Does MULTIBANCO service send any codes by SMS?
Yes.
The service sends activation codes by SMS when the user associates a new mobile device. The service sends a password recovery code by SMS when the user submits a password recovery request.
Does MULTIBANCO service send any passwords by SMS?
Yes.
The service sends a temporary password by SMS when a new user is created in the service. The temporary password is sent to the new user’s mobile phone, and the user must change it at the first access to the service.
What shall I do if I receive a suspicious e-mail or SMS?
If a user receives a suspicious message by SMS or e-mail, or a message which has not been generated by himself by entering data in the service, the user must report the event immediately to the client support team (+351 217 918 703).
What shall I do in case of loss or theft of the POS/smartphone/tablet with the APP installed?
In case of loss or theft, a third party will only be able to access to the service in your mobile devices, without having to enter the credentials (e-mail and password), if the “keep the session alive” option is selected. We suggest that you change the password at another mobile device or Backoffice that has previously been configured in the service. Besides, if a third party accepts payments on your behalf, those payments will always be credited to the IBAN associated to the service, since the service is associated to Merchant IBAN(s) only. In any case, if you wish to cancel the service you can contact your Bank.
Is it safe to use MULTIBANCO service?
Yes.
MULTIBANCO service has the same security features that nowadays SIBS guarantees in the traditional Point-of-Sales of MULTIBANCO Network accepting card payments. The service uses security protocols and algorithms which ensure the confidentiality, integrity and authentication of the transmitted, processed and stored data, complying with the most recent and demanding European security standards. All communications and transactions are monitored on a 24x7x365 basis, by a team totally dedicated to fraud prevention and detection. Among the countries with a higher rate of use of bank cards, Portugal has the lowest overall fraud levels, being pointed out by the European Central Bank as one of the countries with the most secure and reliable payments system.
Here you will find Troubleshooting actions to perform directly with the terminals belonging to the SIBS catalog – Nexgo and Castles, within different scenarios. For support or troubleshooting matters related to terminal models other than Nexgo and Castles, users should contact the correspondent merchant.
The Card Reader Interface is a mechanism that runs in the background and allows the reading of a Portuguese Citizen Card Data – i.e., personal data and address. The interface also allows generic card data reading by running a list of APDU commands.
This section aims to support integrators in providing the necessary elements for configuring their applications to use the Card Reader Interface Service and is divided into three sections:
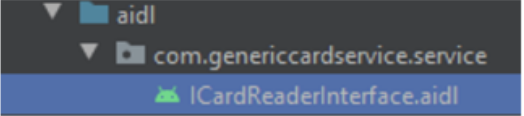
Step 1: Declaring the AIDL file with the service methods
To use this interface, the app that invokes it must declare an AIDL file with the methods that the service provides. This file is identical both in the service and in the app and must be in the same package in both cases.
// ICardReaderInterface.aidl
package genericcardservice.service;

// Declare any non-default types here with import statements

interface ICardReaderInterface {
    /**
    * Demonstrates some basic types that you can use as parameters
    * and run values in AIDL
    */
    String getCitizenCardData(boolean withAddress, String pin);
    String getGenericCardData(int slot, in String[] apduCommands);
    void loadAIDS(String content);
}
The methods will be available after the first build.
Step 2: Connect to the service
When starting the application/feature that needs to use the service, the first thing to do is to create a BrodcastReceiver to receive the intents coming from the service. For that purpose, you can create an extended class of BroadcastReceiver, as illustrated below:
public class CartaoCidadaoReceiver extends BroadcastReceiver {
    private static final String TAG = "MyBroadcastReceiver";
    @Override
    public void onReceive(Context context, Intent intent) {
        Log.w(TAG,"Action received!");
        String result = intent.getStringExtra("data");
        if (result != null) {
            Log.w(TAG, result);
        }
    Toast.makeText(context, result, Toast.LENGTH_LONG).show();
    }
}
Subsequently, create an object of this type, which must be registered as receiver. The past actions are used if you want to receive the response data from the card via broadcast receiver.
After registering the receiver, you can bind to the service. For that purpose, you can use the code shown below:
private void initConnection() {
    Log.w("Binding", "INIT CARD SERVICE");
    if(cardService == null) {
        Intent intent = new Intent(ICardReaderInterface.class.getName());

        /* this is service name which has been declared in the server's manifest file in service's intent-filter */
        intent.setAction("service.cardreader");

        /* From 5.0 annonymous intent calls are suspended so replacing with server app's package name */
        intent.setPackage("com.example.cartaocidadaoservice");

        //binding to remove service
        bindService(intent, serviceConnection, Service.BIND_AUTO_CREATE);
    }
}
The Package defined is that of the app that launches the service.
The serviceConnection variable used in bindService can be declared as shown below:
To check if the service is running, the method shown below can be used. In this method, the name of the intended service is passed and, as a result, a Boolean is returned informing the service status.
Upon ending the service, if you leave the context where it was used (destroy the activity/fragment, for example), you shall do the service unbinding and unregister the receiver.
In response to this method, you get a String which includes a JSON with the different fields read: Citizen Card and Other Cards.
Step 3: Defining the methods for card reading
Citizen card
After a successful binding to the service, the methods provided can be invoked.
To read the Citizen Card, the method is getCitizenCardData and it receives two input parameters:
The first parameter is a Boolean that indicates whether the address data is to be obtained in addition to the personal data. If this is the case, the flag should change to true.
The second parameter is the PIN of the address, which, if not changed, will be “0000”. It should be noted that this PIN is not the same as the PIN for the digital mobile key. If the PIN is incorrect, the maximum number of attempts is three.
try {
    String result = cardService.getCitizenCardData(true, "0000");
    Log.w(Tag, result != null ? result : "-----");
}

catch (RemoteException e) {
    Log.w(Tag, Objects.requireNonNull(e.getMessage()));
    e.printStackTrace();
}

 Screen & Display
  Connection
  Battery/Charging
  Printer
  PIN PED
  Updating apps
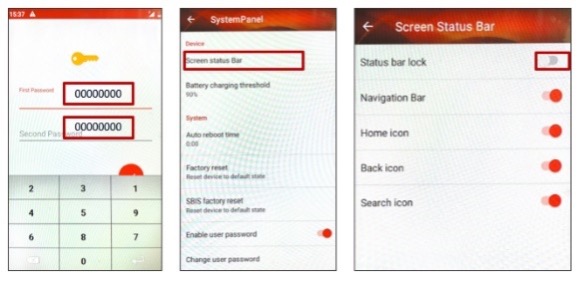

 Screen & Display
  Connection
  Battery / Charging
  Printer
  PIN PED
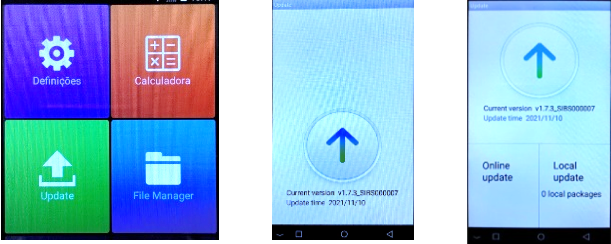

 Accepted payments
  Service enrollment
  Activating account
  Card Reader
  Backoffice
  Using the app
  Manage account
  Proof of payment
  Operation records
  Security