The integration with the Printer can be implemented via:
- SmartPOS SDK: which involves using pre-built libraries and tools, streamlining the development process. The Printer SDK allow apps to directly print receipts through the SDK that communicates directly with the HAL.
- HAL: which consists of a lower-level approach, involving a greater complexity, interacting directly with the hardware components.
SDK
The integration with via SmartPOS SDK Printer, consists of the following steps:
Step 1: Requesting a printer sample to SIBS onboarding team
Step 2: Initiating the SmartPOS SDK Printer
Step 3: Printing the receipt in the SDK
Step 1: Requesting a printer sample to SIBS onboarding team
To perform the integration with the printer via SmartPOS SDK Printer, a printer sample must be requested to SIBS’s Onboarding team through Jira. This integration with the printer is compatible with all SmartPOS devices in MULTIBANCO Network, except Nexgo.
Step 2: Initiating the SmartPOS SDK Printer
This step consists of calling the init method to initiate the SmartPOS SDK Printer. For some features of the device itself, the SDK needs to have access to the context of the app. Start method receives as input, being the context used to communicate with the device.
Below, we identify the input with the init method:
| Name | Description | Format | Mandatory |
|---|---|---|---|
| application | Application | Application | Yes |
| env | Environment | String | Yes |
Step 3: Printing the receipt in the SDK
An app can call the print method to print receipts.
Here we provide you input that should be passed on when invoking the print method:
| Name | Description | Format | Mandatory |
|---|---|---|---|
| printerLineList | Data de generate the receipt | List | Yes |
The input PrinterLineList contains the following object fields:
| Name | Description | Available values | Format | Mandatory |
|---|---|---|---|---|
| getAlignment | Defines text alignement. The field is ignored if fields valueRight and valueLeft are populated for the same line of text and will only be considered if field valueRight is the only one populated. | ‘0’: aligned to the left; ‘1’: centered ‘2’: aligned to the right | Integer | Yes |
| getFontsize | Defines font size. If the field type is populated with the value ‘1’, this field is ignored. | ‘0’: aligned to the left; ‘1’: centered; ‘2’: aligned to the right | Integer | Yes |
| getType | Defines the type of content in a line. | ‘0’: concerning the presentation of the text; ‘1’: concerning the presentation of images If an image is presented, field valueRight must be populated with a base64 of an image | Integer | Yes |
| getValueLeft | Defines the text on the left. In some cases, it can take the form of the description of the value presented to the right. | The value of this field will only be presented if the receipt also has a valueRight. On the template, this value is populated with one of the available placeholders, which will later be replaced by the real value to be presented on the receipt. | String | Yes |
| getValueRight | Defines the text on the right. This field might be used with or without the field valueLeft being defined. | If valueLeft is populated, the value of this field will be presented aligned to the right. If field valueLeft is not populated, the value of this field will be presented in the position established by field alignment. As the previous field, it is populated in the template with a placeholder from a list of possible placeholders, which will later be replaced by the real value on the receipt. | String | Yes |
The Outputs of the printerSDKresult are:
| Name | Description | Format |
|---|---|---|
| PrinterSDKResultType | Error description | Enum |
| result | Result | Boolean |
The printerSDKResultType‘s results:
| Name | Description | Format |
|---|---|---|
| Success | Success | True |
| Paper Out | Printer needs paper | False |
| Error | Generic Error | False |
Below we provide an example of the SmartPOS aidl. :
private void makeReceiptExample() {
    List printerLinesExample = new ArrayList<>();
    String textToPrint = editText.getText().toString();
    String valueOnLeft = "";
    printerLinesExample.add(createPrinterLineObjectFromValues(valueOnLeft, textToPrint, 19, 0, 0));
    mtPrinter = ApiSDKSmartpos.getSmartposSDK().print(makeReceiptExample(FULL_LINE));
    mtPrinter.observe(MainActivity.this, printerSDKResult ->
    {
        String resultType = ((PrinterSDKResult)printerSDKResult).getPrinterSDKResultType().toString();
        Toast.makeText(MainActivity.this, MESSAGE + " " + resultType, Toast.LENGTH_SHORT).show();
    }
}
HAL
This section describes how to integrate with the printer via HAL2. The process consists of three steps:
Step 1: Creating the SmartPOS.aidl.aid.
Step 2: Connect with the Service
Step 3: Obtaining a response from HAL2
Step 1: Creating the SmartPOS.aidl.aid.
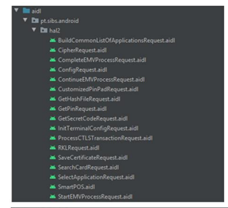
The first step consists of creating the SmartPOS.aidl aid. The AIDL service is identical to a Windows DLL: it is running on the Android system and can be consumed by any application, as long as it shares the same messaging contract: https://developer.android.com/guide/components/aidl.
To use this service, the app that invokes it must have declared and AIDL file with the methods that the service provides. This file is the same in the service and in the app, and in both cases, must be in the same Package.

// SmartPOS.aidl
package pt.sibs.android,hal2;

// Declare any non-default type here with import statements

interface SmartPOS {
    /**
     * Demonstrates some basicy types that you can use as parameters
     * and return values in AIDL.
     */
     void_printerReceipt(String text);
}
The methods will be available only after the first build.
Step 2: Connect with the service
When starting the app or feature that needs to use the service, a BroadcastReceiver must be created to receive the intents coming from the service. For that, we can create a class that extends BroadcastReceiver, by following the next example:
public class Hal2Receiver extends BroadcastReceiver {

    @Override
    public void onReceive (Context context, Intent intent) {
        String type = intent.getStringExtra ("type");
        String sender = intent.getStringExtra ("sender");
        String content = intent.getStringExtra ("content");

        switch (type) {
            case "TO CORE":
            ToCoreEvent event = JsonBuilder.fromJsonConverted(content,
ToCoreEvent.class);
            // EVENT
            return;

            case "RESPONSE_TO_CORE":
            // RESPONSE
            return;
        }

}public class Hal2Util {
public static final String TAG = "Hal2Util";
public static final String HAL_PACKAGE = "pt.sibs.android.hal2";
static void bindSmartPosSercive (Hal2ServiceConnection connection) {
Intent intent = new Intent (HAL_PACKAGE + ".SMART_POS");
intent.setPackage (HAL_PACKAGE);
ApplicationLib.getContext().bindService(intent, connection.getServiceConnection (), Context.BIND_AUTO_CREATE);
}
static void unbindSmartPosService (Hal2ServiceConnection connection) {
of (!connection.isBound()) return;
ApplicationLib.getContext ().unbindService(connection.getServiceConnection ());
connection.unbound ();
}
}You must register and unregister the service after bindService and before unbindService.
private void register () {
    Hal2Util.bindSmartPosService(serviceConnection);
    receiver = new Hal2Receiver ();
    receiver.register(ApplicationLib.getContext());
}

private void unregister() {
    receiver.unregister(ApplicationLib.getContext());
    Hal2Util.unbindSmartPosService(serviceConnection);
The ServiceConnection variable used in bindService can be declared as shown in the following sample:
public class Hal2ServiceConnection implements ServiceConnection {
    private final String TAG = "Hal2ServiceConnection";
    private SmartPOS service;
    private boolean mBound = false;

    void unbound() {
      mBound = false;
    }

    boolean isBound() {
      return = mBound;
    }

    ServiceConnection getServiceConnection() {
      return this;
    }

    public SmartPOS getService() {
      return service;
    }

    @Override
    public void onServiceConnected(ComponentName componentName, IBinder iBinder) {
      Log.d(TAG, "onServiceConnected");
      service = SmartPOS.Stub.asInterface(iBinder);
      mBound = true;
    }

    @Override
    public void onServiceDisconnected(ComponentName componentName) {
      Log.d(TAG, "onServiceDisconnected");
      unbound ();
   }

}
To check if the service is running, the following method can be used. In this method, the service names whose status we want to know is provided and, as a result, a Boolean is returned indicating if the service is running.
isMyServiceRunning ("genericcardservice.service.CardReaderService")private boolean isMyServiceRunning(String serviceClass) {
ActivityManager manager = (ActivityManager) getSystemService(Context.ACTIVITY_SERVICE);
for (ActivityManager.RunningServiceInfo service : manager.getRunningServices(Integer.MAX_VALUE)) {
if(serviceClass.equalsIgnoreCase(service.service.getClassName())) {
return true;
}
}
return false;
}Upon ending the service, if you leave the context where it was used (for example: destroy the activity/fragment), you shall unbind the service and unregister the receiver.
@Override
protected void onDestroy() {
     super.onDestroy();
     unbindService(serviceConnection);
     unregisterReceiver(br);
}
To validate if the HAL2 service is actually running on the equipment, the Code shown below can be used.
public static boolean isHal2Available() {
    try {
        Context context = ApplicationLib.getContext();
        PackageManager packageManager = context.getPackageManager();

        return packageManager.getApplicationInfo(Hal2Util.HAL_PACKAGE, 0).enabled;
    }   catch (PackageManager.NameNotFoundException e){
            return false;
    }
}
Step 3: Obtaining a response from HAL2
HAL2 responds via broadcastReceiver. The Intent object has identifiers that indicate whether the message is of the Event Type or the Response Type. If it is an Event, a message may be displayed to the user as the process has yet to finish. If it is a response, it means that it is the final response to the request executed by the application.
The Identifiers returned in the intent are:
- Type: Type of Return
- TO_CORE: Event
- RESPONSE_TO_CORE: Response
- Sender: Name of the service executed by the application
- Content: Json object in string format, which contains the ToCoreEvent object or the response object to the executed request
After a successful bind to the service, the methods can be invoked. The method that must be used to print a receipt on the equipment is _printReceipt. This method receives a JsonArray where each JsonObject contains the text/image to be displayed on the receipt. The JsonObject has the following fields:
- Font size
- Text alignment (Left – 0; Center – 1 ; Right -2)
- Type of content (Text – 0; Image – 1)
- Text on the left
- Text on the right
The default text, if only one text is required, is the one on the right. Images must be converted to base64.
@Override
public void printReceipt(String receipt) {
    executeHal(new HalRunner() {
      @Override
      public void execute() throws RemoteException {
          serviceConnection.getService()._printReceipt(receipt);
      }
    });
}
After executing the request to print the receipt, HAL2 respond via a ToCoreEvent object with the following error codes:
| Error Code | Definition |
|---|---|
| 0x0001 | No paper |
| 0x0002 | Paper Jam |
| 0x0003 | Printing |
Object ToCoreEvent of the HAL:
class ToCoreEvent {
    int eventCode;
    int messageIdentifier;
    string languagePreference;
    int holdTime;
    int source;
}
When printing is finished, HAL2 returns a PrintReceiptResponse object in response to the print request with the following possible outcomes:
| Error Code | Definition |
|---|---|
| 0x0000 | Successful print |
| 0x0001 | No paper |
| 0x0002 | Paper Jam |
| 0xFFFF | Other errors |
Object PrintReceiptResponse:
class PrintReceiptResponse {
    int source;
}
Below, you can find an example of a JsonArray to be printed:
[
    { "valueLeft": "texto linha 1",
    "valueRight": "",
    "align": "LEFT",
    "fontSize": 14,
    "type": "0"  },

    { "valueLeft": "",
    "valueRight": "texto linha 2",
    "align": "LEFT",
    "fontSize": 14,
    "type": "0" },

    { "valueLeft": "",
    "valueRight": "iVBORw0KGgoAAAANSUhEUgAAAKcAAABLCAYAAAAVkJcVAAAAAXNSR0IArs4c6QAAENZ JREFUeAHtWwmUFcUV7W4GEAZBQcAI0RkBUYNxixoQEBQSNawqHlHihhgxoOKS5ESNk3B y4jEeN0TUuE", //IMAGEM
    "align": "CENTER",
    "fontSize": 1,
    "type": "1" }
][
{ "valueLeft": "", "valueRight": "%LOGO%", "fontsize": 1, "alignment": 1, "type": 1 },
{ "valueLeft": "", "valueRight": "%ACCEPTOR_NAME%", "fontsize": 22, "alignment": 0, "type": 0 },
{ "valueLeft": "", "valueRight": "%ACCEPTOR_ADDR%", "fontsize": 22, "alignment": 0, "type": 0 },
{ "valueLeft": "", "valueRight": "%ACCEPTOR_LCTN%", "fontsize": 22, "alignment": 0, "type": 0 },
{ "valueLeft": "%TPA_NUMBER%","valueRight": "%MID%", "fontsize" : 20, "alignment": 0, "type": 0},
{ "valueLeft": "", "valueRight": "%TPA_NAME%", "fontsize": 22, "alignment": 0, "type": 0 },
{ "valueLeft": "", "valueRight": "%REFERENCE%", "fontsize": 22, "alignment": 0, "type": 0 },
{ "valueLeft": "", "valueRight": "%STARS%", "fontsize": 22, "alignment": 1, "type": 0 }
]Object JsonLine
public class PrinterStringObject {
    // { "valueLeft": , "valueRight": "%LOGO", "fontsize": 1, "alignment":1, "flag": false, "type": 1 },
    public String valueLeft;
    public String valueRight;
    public int fontsize;
    public int alignment;
    public int type;
}
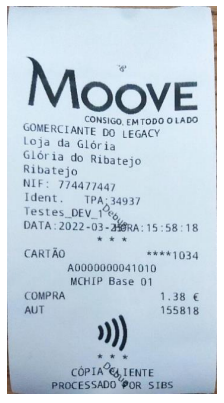
The following image shows an example of a printed receipt from the SmartPOS:


